Message Bus & Message Queue

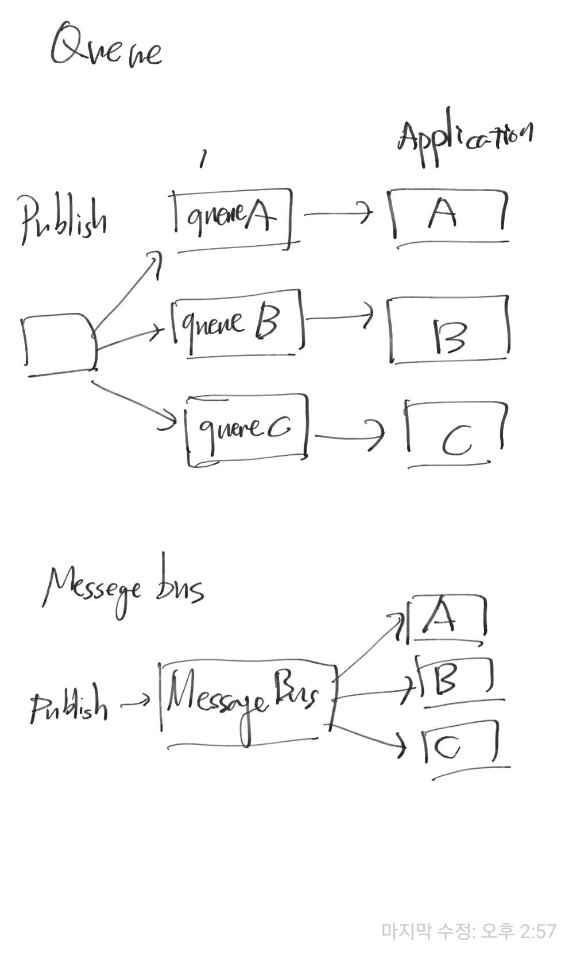
Message Queue 와 Message Bus의 차이


Message Queue

  • 두 개 이상의 프로세스 가 공통 시스템 메시지 큐에 대한 액세스를 통해 정보를 교환

하나 이상의 어플리케이션에서 만들어진 데이터들을 FIFO 방식으로 사용될수 있다.

A,B,C 의 어플리케이션이 있을경우에는 각 어플리케이션 마다 별도의 메세지 큐가 추가된다.

메세지는 일반적으로 읽을때 삭제되므로 여러 다른 종속응용 프로그램간에 대기열을 공유하는것이 일반적이지 않다.

일반적으로는 메시지 큐와 종속 응용프로그램 간에는 1:1 의 통신 관계가 있다.


Message Bus

  • 다른 시스템이 통해 통신 할 수 있도록 메시징 인프라 인터페이스를 공유 세트 ( 메시지 버스 ).

메시지 버스 또는 서비스 버스는 하나 또는 그 이상의 응용프로그램이 하나 이상의 다른 응용 프로그램에 메시지를 전달하는 방법을 제공

선입 선출의 주문이 보장 되지 않을 수 있으며, 버스 가입자는 메시지 발신자의 지식 없이도 출입이 가능하다.

보내는 응용 프로그램이 모든 큐에 메시지를 명시적으로 추가하는 큐와 달리 메세지를 게시 하면 버스로 보내고, 버스에 연결된 어플리케이션들이 메시지를 각자 가지고가는 방식

참고

https://ardalis.com/bus-or-queue

https://stackoverflow.com/questions/7793927/message-queue-vs-message-bus-what-are-the-differences

Spark ElasticSearch 배포하기

위에서 spark의 코드를작성하고 테스트 까지 완료 하였다.

이제 배포를 해야하는데 어떻게 할까 ?

실행 가능한 fat jar로 만들기 위해서 하위 부분 jar 를 추가 해주었다.

plugins {
    id 'scala'

}

group 'KafkaEsSpark'
version '1.0-SNAPSHOT'

sourceCompatibility = 1.8

repositories {
    mavenCentral()
}

dependencies {
    testCompile group: 'junit', name: 'junit', version: '4.12'
    // https://mvnrepository.com/artifact/org.scala-lang/scala-library
    compile group: 'org.scala-lang', name: 'scala-library', version: '2.11.7'
    compile 'org.apache.spark:spark-core_2.11:2.4.3'
    compile 'com.crealytics:spark-excel_2.11:0.12.0'
    compile 'org.apache.spark:spark-sql_2.11:2.4.3'
    compile 'org.elasticsearch:elasticsearch-spark-20_2.11:6.5.2'
    // https://mvnrepository.com/artifact/org.apache.spark/spark-streaming
    compile 'org.apache.spark:spark-streaming_2.11:2.4.3'
    compile 'org.apache.spark:spark-streaming-kafka-0-10_2.11:2.4.3'
}

jar {
    classifier = 'all'
    manifest {
        attributes "Main-Class": "com.kafkastream.word.KafkaStreaming"
    }
    from{
        configurations.compile.collect { it.isDirectory() ? it: zipTree(it)}
    }
    baseName = 'SparkEsKafka'
    zip64 true
}

task run(type:JavaExec, dependsOn: classes) {
    main = "com.kafkastream.word.KafkaStreaming"
    classpath sourceSets.main.runtimeClasspath
    classpath configurations.runtime
}
task fatJar(type: Jar){
    zip64 true
    description = "Assembles a Hadoop ready fat jar file"
    baseName = project.name + '-all'
    doFirst {
        from {
            configurations.compile.collect { it.isDirectory() ? it : zipTree(it) }
        }
    }
    manifest {
        attributes "Main-Class": "com.kafkastream.word.KafkaStreaming"
    }
    exclude 'META-INF/*.RSA','META-INF/*.SF','META-INF/*.DSA'
    with jar
}

프로젝트 루트 디렉토리에있는 gradlew 파일이 있는 곳에서

$./gradlew fatJar

를 하게 되면 프로젝트 루트폴더 build> libs 에 kafkaspark-all-1.0-SNAPSHOT.jar 파일이 보인다.

/kafkaspark/build/libs$ls

SparkEsKafka-1.0-SNAPSHOT-all.jar 
kafkaspark-all-1.0-SNAPSHOT.jar

모든 라이브러리들의 의존성을 한번에 묶어줬기 때문에 spark-submit을 통해 제출하지 않아도 실행이 되는것같다.

$java -jar kafkaspark-all-1.0-SNAPSHOT.jar

실행을 해보면 ?

/build/libs$java -jar kafkaspark-all-1.0-SNAPSHOT.jar 
hello
Using Spark's default log4j profile: org/apache/spark/log4j-defaults.properties
19/08/24 12:02:40 INFO SparkContext: Running Spark version 2.4.3
19/08/24 12:02:40 WARN NativeCodeLoader: Unable to load native-hadoop library for your platform... using builtin-java classes where applicable
19/08/24 12:02:40 INFO SparkContext: Submitted application: KafkaSpark
19/08/24 12:02:40 INFO SecurityManager: Changing view acls to: daeyunkim
19/08/24 12:02:40 INFO SecurityManager: Changing modify acls to: daeyunkim
19/08/24 12:02:40 INFO SecurityManager: Changing view acls groups to: 
19/08/24 12:02:40 INFO SecurityManager: Changing modify acls groups to: 
19/08/24 12:02:40 INFO SecurityManager: SecurityManager: authentication disabled;
...
19/08/24 12:02:41 WARN StreamingContext: spark.master should be set as local[n], n > 1 in local mode if you have receivers to get data, otherwise Spark jobs will not get resources to process the received data.
19/08/24 12:02:41 WARN KafkaUtils: overriding enable.auto.commit to false for executor
19/08/24 12:02:41 WARN KafkaUtils: overriding auto.offset.reset to none for executor
19/08/24 12:02:41 WARN KafkaUtils: overriding executor group.id to spark-executor-testGroup
19/08/24 12:02:41 WARN KafkaUtils: overriding receive.buffer.bytes to 65536 see KAFKA-3135
....
19/08/24 12:02:41 INFO MappedDStream: Initialized and validated 
-------------------------------------------
Time: 1566615780000 ms
-------------------------------------------
...

실행이 잘된다 .

실행한 상태에서

search_word에 토픽에 전달을 하게 되면 잘 받아와서 elasticsearch에 잘 저장됨

소스는 여기에서 볼수 있다. (약간 수정해서 kafka broker의 아이디와 elasticsearch의 주소를 적을수 있게 변경했다.)

https://github.com/DaeyunKim/Kafka-SparkStreaming-Elasticsearch

실행 순서 :

  1. kafka 를 위한 zookeeper 실행
  2. Kafka 서버 실행 - 토픽 (search_word) 추가
  3. elasticsearch 실행
  4. Build 한 jar 파일 만들기
    ProjectRoot에서 실행
    $./gradlew fatJar
  5. (테스트) kafka console producer를 통해서 테스트 실행 함
    kafkaspark-all-1.0-SNAPSHOT.jar 는 프로젝트 루트의 아래 /build/lib에 위치해있다.
    $java -jar kafkaspark-all-1.0-SNAPSHOT.jar 127.0.0.1 9200 localhost:9092

spark streaming 으로 kafka-0.10 consumer api를 사용하여 elasticsearch에 저장하는 프로젝트

참고자료

http://www.hongyusu.com/amt/spark-streaming-kafka-avro-and-registry.html

Elasticsearch 에서 field의 고유값의 갯수 세기

이전 글에서 Spark를 통해 kafka에서 메시지를 Elasticsearch에 저장까지 완료 하였다.

이제 terms aggregation을 통해 필드의 갯수만 집계하면될것이라 생각했는데, 에러 발생 에러발생!

GET realtime_word/_search
{
  "query":{
   "match_all": {}
  },
  "size":0,
  "aggregations":{
    "count_word":{
      "terms":{
        "field":"word"
      }
    }
  }
}

아래와 같은 에러가...

{
  "error": {
    "root_cause": [
      {
        "type": "illegal_argument_exception",
        "reason": "Fielddata is disabled on text fields by default. Set fielddata=true on [word] in order to load fielddata in memory by uninverting the inverted index. Note that this can however use significant memory. Alternatively use a keyword field instead."
      }
    ],
    "type": "search_phase_execution_exception",
    "reason": "all shards failed",
    "phase": "query",
    "grouped": true,
    "failed_shards": [
      {
        "shard": 0,
        "index": "realtime_word",
        "node": "uCyuJNg-TVu3E7g7nzRAZw",
        "reason": {
          "type": "illegal_argument_exception",
          "reason": "Fielddata is disabled on text fields by default. Set fielddata=true on [word] in order to load fielddata in memory by uninverting the inverted index. Note that this can however use significant memory. Alternatively use a keyword field instead."
        }
      }
    ],
    "caused_by": {
      "type": "illegal_argument_exception",
      "reason": "Fielddata is disabled on text fields by default. Set fielddata=true on [word] in order to load fielddata in memory by uninverting the inverted index. Note that this can however use significant memory. Alternatively use a keyword field instead.",
      "caused_by": {
        "type": "illegal_argument_exception",
        "reason": "Fielddata is disabled on text fields by default. Set fielddata=true on [word] in order to load fielddata in memory by uninverting the inverted index. Note that this can however use significant memory. Alternatively use a keyword field instead."
      }
    }
  },
  "status": 400
}

이유는 아래의 블로그 참고 했다.

기존의 맵핑

{
  "realtime_word" : {
    "mappings" : {
      "_doc" : {
        "properties" : {
          "word" : {
            "type" : "text",
            "fields" : {
              "keyword" : {
                "type" : "keyword",
                "ignore_above" : 256
              }
            }
          }
        }
      }
    }
  }
}

기존의 맵핑 변경하기

(6.5버전을 사용하기 때문에 뒤에 _doc를 붙여줌)

PUT realtime_word/_mapping/_doc
{
  "properties": {
    "word": { 
      "type":     "text",
      "fielddata": true
    }
  }
}

변경된 맵핑 정보

{
  "realtime_word" : {
    "mappings" : {
      "_doc" : {
        "properties" : {
          "word" : {
            "type" : "text",
            "fields" : {
              "keyword" : {
                "type" : "keyword",
                "ignore_above" : 256
              }
            },
            "fielddata" : true
          }
        }
      }
    }
  }
}

다시 terms aggregation을 사용해서 결과를 얻어오게 되면 ? 아래와 같은 결과를 얻을수 있다.

{
  "took" : 1,
  "timed_out" : false,
  "_shards" : {
    "total" : 5,
    "successful" : 5,
    "skipped" : 0,
    "failed" : 0
  },
  "hits" : {
    "total" : 7,
    "max_score" : 0.0,
    "hits" : [ ]
  },
  "aggregations" : {
    "count_word" : {
      "doc_count_error_upper_bound" : 0,
      "sum_other_doc_count" : 0,
      "buckets" : [
        {
          "key" : "samsung",
          "doc_count" : 1
        },
        {
          "key" : "시계",
          "doc_count" : 1
        },
        {
          "key" : "안경",
          "doc_count" : 1
        },
        {
          "key" : "의자",
          "doc_count" : 1
        },
        {
          "key" : "책상",
          "doc_count" : 1
        },
        {
          "key" : "컵",
          "doc_count" : 1
        },
        {
          "key" : "테이블",
          "doc_count" : 1
        }
      ]
    }
  }
}

http://blog.naver.com/PostView.nhn?blogId=rokking1&logNo=221366675132&categoryNo=0&parentCategoryNo=30&viewDate=&currentPage=1&postListTopCurrentPage=1&from=search

https://www.elastic.co/guide/en/elasticsearch/reference/current/fielddata.html

Spark Consumer로 받은 데이터를 Elasticsearch에 저장하기

dstream 과 elasticsearch의 spark context 두개가 있는데, spark에서는 하나의 jvm에서 하나의 context만 만들수 있다.

공식 문서를 참조하여 아래 처럼 SparkContext객체를 만들어서 streamingContext의 인자 값으로 넣어준다.

import org.apache.spark.SparkContext
import org.apache.spark.SparkContext._     //1          
import org.apache.spark.streaming.StreamingContext
import org.apache.spark.streaming.StreamingContext._

import org.elasticsearch.spark.streaming._   //2   

...

val conf = ...
val sc = new SparkContext(conf)             //3         
val ssc = new StreamingContext(sc, Seconds(1))  //4     

val numbers = Map("one" -> 1, "two" -> 2, "three" -> 3)
val airports = Map("arrival" -> "Otopeni", "SFO" -> "San Fran")

val rdd = sc.makeRDD(Seq(numbers, airports))
val microbatches = mutable.Queue(rdd)       //5         

ssc.queueStream(microbatches).saveToEs("spark/docs") //6

ssc.start()
ssc.awaitTermination() //7

아래의 설명

1. Spark and Spark Streaming Scala imports

2. elasticsearch-hadoop Spark Streaming imports

3. start Spark through its Scala API

4. start SparkStreaming context by passing it the SparkContext. The microbatches will be processed every second.

5. makeRDD creates an ad-hoc RDD based on the collection specified; any other RDD (in Java or Scala) can be passed in. Create a queue of `RDD`s to signify the microbatches to perform.

6. Create a DStream out of the RDD`s and index the content (namely the two _documents_ (numbers and airports)) in {es} under `spark/docs

7. Start the spark Streaming Job and wait for it to eventually finish.

Elasticsearch-Spark 공식 문서 : https://www.elastic.co/guide/en/elasticsearch/hadoop/master/spark.html

위의 문서를 응용하여 저장하는 아래의 코드를 추가 하였다.

        //추가 한 부분 
    val streamData  =  kafkaStream.map(raw=>Map("word"->raw.value()))
    println("SparkContext refresh")
    streamData.print()
    streamData.saveToEs("realtime_word/_doc")

spark streaming을 이용하여 Elasticsearch에 저장하는 최종 코드는 아래와 같이 완성이 되었다.

package com.kafkastream.word

import org.apache.kafka.clients.consumer.ConsumerRecord
import org.apache.kafka.common.serialization.StringDeserializer
import org.apache.spark.rdd.RDD
import org.apache.spark.{SparkConf, SparkContext}
import org.apache.spark.streaming.dstream.InputDStream
import org.apache.spark.streaming.kafka010.ConsumerStrategies.Subscribe
import org.apache.spark.streaming.kafka010.KafkaUtils
import org.apache.spark.streaming.kafka010.LocationStrategies.PreferConsistent
import org.apache.spark.streaming.{Seconds, StreamingContext}
import org.apache.spark.streaming.StreamingContext._
import org.elasticsearch.spark.streaming._

import scala.collection.mutable
object KafkaStreaming{
  def main(args: Array[String]): Unit = {
    println("hello")
    val conf = new SparkConf().setAppName("KafkaSpark").setMaster("local")
    conf.set("es.index.auto.create","true")
    conf.set("es.nodes","127.0.0.1")
    conf.set("es.port","9200")
    val sc = new SparkContext(conf)
    val ssc = new StreamingContext(sc, Seconds(10))//stream context

    val kafkaParams = Map(
      "bootstrap.servers" -> "localhost:9092",
      "key.deserializer" -> classOf[StringDeserializer],
      "value.deserializer" -> classOf[StringDeserializer],
      "group.id" -> "testGroup",
      "auto.offset.reset" -> "latest",
      "enable.auto.commit" -> (false: java.lang.Boolean))
    val topics = Set("search_word")
    val kafkaStream :InputDStream[ConsumerRecord[String, String]]= KafkaUtils.createDirectStream[String,String](ssc,PreferConsistent,Subscribe[String,String](topics,kafkaParams))

        //추가 한 부분 
    val streamData  =  kafkaStream.map(raw=>Map("word"->raw.value()))
    println("SparkContext refresh")
    streamData.print()
    streamData.saveToEs("realtime_word/_doc")

    ssc.start()
    ssc.awaitTermination()
  }
}

elasticsearch를 통해 테스트를 해보자

kafka-console-producer.sh 를 통해 아래와 같은 메시지를 생성하였다.

>의자
>시계
>컵

spark streaming 로그

19/08/17 11:14:20 INFO DAGScheduler: ResultStage 24 (print at KafkaStreaming.scala:40) finished in 0.009 s
19/08/17 11:14:20 INFO DAGScheduler: Job 24 finished: print at KafkaStreaming.scala:40, took 0.010485 s
-------------------------------------------
Time: 1566008060000 ms
-------------------------------------------
Map(word -> 의자 )

19/08/17 11:14:20 INFO JobScheduler: Finished job streaming job 1566008060000 ms.0 from job set of time 1566008060000 ms
19/08/17 11:14:20 INFO JobScheduler: Starting job streaming job 1566008060000 ms.1 from job set of time 1566008060000 ms
....
19/08/17 11:14:30 INFO DAGScheduler: ResultStage 26 (print at KafkaStreaming.scala:40) finished in 0.009 s
19/08/17 11:14:30 INFO DAGScheduler: Job 26 finished: print at KafkaStreaming.scala:40, took 0.012619 s
-------------------------------------------
Time: 1566008070000 ms
-------------------------------------------
Map(word -> 시계)
Map(word -> 컵)

elasticsearch 에서 realtime_word 의 인덱스에 doc가 제대로 들어갔는지 확인

(kibana에서 확인)

GET realtime_word/_search

이전에 테스트로 들어가있는 단어 외에 producer를 통해 추가가 된것을 알수 있다.

{
  "took" : 0,
  "timed_out" : false,
  "_shards" : {
    "total" : 5,
    "successful" : 5,
    "skipped" : 0,
    "failed" : 0
  },
  "hits" : {
    "total" : 7,
    "max_score" : 1.0,
    "hits" : [
      {
        "_index" : "realtime_word",
        "_type" : "_doc",
        "_id" : "Q8FZnWwBwztwv-DDmfgE",
        "_score" : 1.0,
        "_source" : {
          "word" : "테이블"
        }
      },
      {
        "_index" : "realtime_word",
        "_type" : "_doc",
        "_id" : "lsFanWwBwztwv-DD0fiA",
        "_score" : 1.0,
        "_source" : {
          "word" : "시계"
        }
      },
      {
        "_index" : "realtime_word",
        "_type" : "_doc",
        "_id" : "RMFZnWwBwztwv-DDmfgE",
        "_score" : 1.0,
        "_source" : {
          "word" : "책상"
        }
      },
      {
        "_index" : "realtime_word",
        "_type" : "_doc",
        "_id" : "i8FanWwBwztwv-DDqvhu",
        "_score" : 1.0,
        "_source" : {
          "word" : "의자 "
        }
      },
      {
        "_index" : "realtime_word",
        "_type" : "_doc",
        "_id" : "McFNnWwBwztwv-DD_vXD",
        "_score" : 1.0,
        "_source" : {
          "word" : "samsung"
        }
      },
      {
        "_index" : "realtime_word",
        "_type" : "_doc",
        "_id" : "OMFZnWwBwztwv-DDcvgy",
        "_score" : 1.0,
        "_source" : {
          "word" : "안경"
        }
      },
      {
        "_index" : "realtime_word",
        "_type" : "_doc",
        "_id" : "l8FanWwBwztwv-DD0fiA",
        "_score" : 1.0,
        "_source" : {
          "word" : "컵"
        }
      }
    ]
  }
}

마지막 글에서는 elasticsearch에서 terms 어그리게이션을 사용한 인기순위를 사용하는것에 대해 실습을 해보겠다.
Spark dstreaming 예제 실습

이전에 spark를 통해 elasticsearch에 데이터를 삽입한 것 처럼 다시 환경을 구축하고 배포까지 테스트를 해보겠다.

spark 홈페이지 api

https://spark.apache.org/docs/latest/streaming-programming-guide.html

Dependency 추가 하기

Grade

implementation 'org.apache.spark:spark-streaming_2.11:2.4.3'

maven

<dependency>
    <groupId>org.apache.spark</groupId>
    <artifactId>spark-streaming_2.12</artifactId>
    <version>2.4.3</version>
    <scope>provided</scope>
</dependency>

Kafka, flume, kenesis 등은 spark-streaming core에 포함되어있지않아 , 별도로 의존성을 추가해줘야한다.

For ingesting data from sources like Kafka, Flume, and Kinesis that are not present in the Spark Streaming core API, you will have to add the corresponding artifact spark-streaming-xyz_2.12 to the dependencies. For example, some of the common ones are as follows.

Source Artifact
Kafka spark-streaming-kafka-0-10_2.12
https://spark.apache.org/docs/2.2.0/streaming-kafka-0-8-integration.html
Flume spark-streaming-flume_2.12
Kinesis spark-streaming-kinesis-asl_2.12 [Amazon Software License]

SPARK CODE

kafka에서 데이터를 받아와야하기 때문에 아래와 같은 의존성라이브러리를 또 추가

예전에는 kafka 0.8 버전을 사용하였는데 kafka 0.10 버전으로 사용하는 것을 선택했다.

Kafka0.8에서 kafka0.10 으로 업데이트된건 나중에 따로 정리를 할것이다.

groupId = org.apache.spark
artifactId = spark-streaming-kafka-0-10_2.11
version = 2.2.0

gradle

implementation 'org.apache.spark:spark-streaming-kafka-0-10_2.11:2.4.3'

maven

<dependency>
  <groupId>org.apache.spark</groupId>
  <artifactId>spark-streaming-kafka-0-10_2.11</artifactId>
  <version>2.4.3</version>
</dependency>

https://spark.apache.org/docs/2.2.0/streaming-kafka-0-10-integration.html

spark 코드는 다음과 같다

package com.kafkastream.word

import org.apache.kafka.clients.consumer.ConsumerRecord
import org.apache.kafka.common.serialization.StringDeserializer
import org.apache.spark.SparkConf
import org.apache.spark.streaming.dstream.InputDStream
import org.apache.spark.streaming.kafka010.ConsumerStrategies.Subscribe
import org.apache.spark.streaming.kafka010.KafkaUtils
import org.apache.spark.streaming.kafka010.LocationStrategies.PreferConsistent
import org.apache.spark.streaming.{Seconds, StreamingContext}

object KafkaStreaming{
  def main(args: Array[String]): Unit = {
    println("hello")
    val conf = new SparkConf().setAppName("KafkaSpark").setMaster("local")
    val ssc = new StreamingContext(conf, Seconds(10))

    val kafkaParams = Map(
      "bootstrap.servers" -> "localhost:9092",
      "key.deserializer" -> classOf[StringDeserializer],
      "value.deserializer" -> classOf[StringDeserializer],
      "group.id" -> "testGroup",
      "auto.offset.reset" -> "latest",
      "enable.auto.commit" -> (false: java.lang.Boolean))
    val topics = Set("search_word")
    val kafkaStream :InputDStream[ConsumerRecord[String, String]]= KafkaUtils.createDirectStream[String,String](ssc,PreferConsistent,Subscribe[String,String](topics,kafkaParams))

    kafkaStream.map(raw=>raw.value()).print()
    println("SparkContext refresh")
    ssc.start()
    ssc.awaitTermination()
  }
}

위와 같이 시작을 하고 producer에 가위 라는 값을 보내면 아래와 같이 에러가 난다 .

Serialization 관련 에러인 것같은데....

serialized key의 값이 -1이기 때문에 발생하는 에러인것같다.

key값을 출력하지않고 stream에서 value만 가지고 와서 출력을 하면 된다.

val kafkaStream :InputDStream[ConsumerRecord[String, String]]= KafkaUtils.createDirectStream[String,String](ssc,PreferConsistent,Subscribe[String,String](topics,kafkaParams))

kafkaStream.map(raw=>raw.value()).print() //추가한부분 value

ssc.start()

그리고 다시 실행한뒤 console-producer를 통해 화장품 , 가방 이라는 메세지를 보냈다.

19/08/16 07:44:50 INFO TaskSchedulerImpl: Removed TaskSet 2.0, whose tasks have all completed, from pool 
19/08/16 07:44:50 INFO DAGScheduler: ResultStage 2 (print at KafkaStreaming.scala:28) finished in 0.080 s
19/08/16 07:44:50 INFO DAGScheduler: Job 2 finished: print at KafkaStreaming.scala:28, took 0.086579 s
-------------------------------------------
Time: 1565995490000 ms
-------------------------------------------
화장품
가방

19/08/16 07:44:50 INFO JobScheduler: Finished job streaming job 1565995490000 ms.0 from job set of time 1565995490000 ms
19/08/16 07:44:50 INFO MapPartitionsRDD: Removing RDD 3 from persistence list
19/08/16 07:44:50 INFO JobScheduler: Total delay: 0.107 s for time 1565995490000 ms (execution: 0.098 s)
19/08/16 07:44:50 INFO BlockManager: Removing RDD 3

https://www.rittmanmead.com/blog/2019/03/analysing-kafka-data-in-scala-spark/

TODO.Jar 파일로 만들어서 테스트하기

웹에서 단어 검색 어플리케이션을 작성 하였으면 이제는 단어를 검색한 결과의 로그를 사용하여 인기 검색어를 만들어보기로 하였다.

작업이 두가지로 나뉘어지는데, 첫번째는 spring log에서 kafka로 검색로그를 보내기, 두번째는 kafka에 쌓인 데이터를 spark에서 5분마다 elasticsearch 데이터에 삽입하기

내가 맡은 부분은 spark로 kafka 데이터를 subscribe 해서 5분마다 elasticsearch에 넣어주는 모듈을 만들기로 했다.

kafka consumer를 통해서 spark streaming
Kafka brocker => spark streaming
(시간, 단어) => 1분동안 데이터 모아서 streaming 처리 

Kafka consumer에서 위와 같은 데이터 불러와서 spark streaming으로 받아오기

작업 순서

  1. Kafka 설치
  2. producer 에서 데이터 보내기
  3. spark streaming (consumer 연결하기)
  4. es에 저장하기

작업해야할것

  1. Kafka 설치 후 producer/consumer 테스트

카프카 홈페이지에서 다운로드 후 설치

Kafka 를 실행 하기 위해서는 zookeeper가 필수로 필요하지만

kafka 파일안에 단일노드에서 실행하기 위한 zookeeper 실행파일, config 파일이 포함되어있다.

( kafka_home/bin/zookeeper-server-start.sh, kafka_home/config/zookeeper.properties )

(1). zookeeper 실행

$cd Kafka_HOME
$./bin/zookeeper-server-start.sh ./config/zookeeper.properties
[2019-08-15 12:37:18,846] INFO Reading configuration from: ./config/zookeeper.properties (org.apache.zookeeper.server.quorum.QuorumPeerConfig)
.....
[2019-08-15 12:37:18,907] INFO Using org.apache.zookeeper.server.NIOServerCnxnFactory as server connection factory (org.apache.zookeeper.server.ServerCnxnFactory)
[2019-08-15 12:37:18,923] INFO binding to port 0.0.0.0/0.0.0.0:2181 (org.apache.zookeeper.server.NIOServerCnxnFactory)

(2). kafka 실행

$./bin/kafka-server-start.sh ./config/server.properties
[2019-08-15 12:39:31,139] INFO Registered kafka:type=kafka.Log4jController MBean (kafka.utils.Log4jControllerRegistration$)
...
[2019-08-15 12:39:32,253] INFO Kafka startTimeMs: 1565840372251 (org.apache.kafka.common.utils.AppInfoParser)
[2019-08-15 12:39:32,254] INFO [KafkaServer id=0] started (kafka.server.KafkaServer)

(3). 프로세스 확인

$jps
98868 GradleDaemon
5206 QuorumPeerMain
5639 Kafka
10906
5995 Jps

5206 QuorumPeerMain 은 zookeeper,5639 Kafka 는 Kafka 를 의미

Kafka는 토픽을 통해 producer와 consumer로 데이터를 생산하고 받아진다.

(4). 토픽 생성

단어 검색의 로그 결과를 받는 토픽은 search_word 로 설정

##토픽 생성
$./bin/kafka-topics.sh --create --bootstrap-server localhost:9092 --replication-factor 1 --partitions 1 --topic search_word
WARNING: Due to limitations in metric names, topics with a period ('.') or underscore ('_') could collide. To avoid issues it is best to use either, but not both.

##토픽 생성 확인
$./bin/kafka-topics.sh --list --bootstrap-server localhost:9092
search_word


토픽이 생성되면 producer에 매세지를 보내고 consumer를 통해 받는 테스트를 해보겠다.


(5). 메시지 보내기(console-producer)

$./bin/kafka-console-producer.sh --broker-list localhost:9092 --topic search_word
>hi
>가위

(6). 메시지 받기(console-consumer)    

$./bin/kafka-console-consumer.sh --bootstrap-server localhost:9092 --topic search_word --from-beginning
hi
가위

console을 통해 확인을 한 결과 제대로 설치가 된 것 같다.

더 다양한 옵션들도 지원한다.

kafka 설치

카프카 프로듀서, 브로커, 컨슈머, 주키퍼로 분류

이전에 jdk가 설치 되어 있어야 한다.


Zookeeper 설치


$wget https://archive.apache.org/dist/zookeeper/zookeeper-3.4.8/zookeeper-3.4.8.tar.gz

주키퍼는 서버 여러대를 클러스터로 구성하고, 분산 애플리케이션들이 각각 클라이언트가 되어 주키퍼 서버들과 커넥션을 맺은후, 상태 정보를 주고받음

상태정보들은 znode라 불리는곳에 key-value형태로 저장

znode에 key-value형태로 저장된 것을 이용하여 분산 애플리케이션들은 서로 데이터를 주고 받음

znode는 데이터를 저장하기 위한 공간의 이름으로 컴퓨터의 파일이나 폴더의 개념

znode에 저장하는 데이터 크기는 byte에서 kilobyte정도로 매우 작음

디렉토리와 비슷한 형태로 자식노드를 가지고 있는 계층형으로 구성


지노드는 데이터 변경 등에 유효성 검사 등을 위해 버전 번호를 관리, 데이터가 변경될 때마다 지노드의 번호가 증가


주키퍼에 저장되는 데이터는 모두 메모리에 저장되어 처리량이 크고 속도도 빠르다.


주키퍼는 별도의 디렉토리를 사용

디렉토리에는 지노드의 복사본인 스냅샷과 트랜잭션 로그들이 저장

(지노드의 변경이 일어나면 트랜잭션 로그에 추가 됨) 로그가 어느정도 커지면 모든 지노드의 상태 스탭샷이 파일시스템에 저장


주키퍼 설치시에 위와 같은 스냅샷과 트랜잭션을 저장할 디렉토리가필요


$mkdir -p ~/zdata

주키퍼 노드를 구분 하기 위한 id를 만들어야한다.

zookeeper에서는 myid라고 부르며 정수 형태로 만들어주면된다.

$cd ~/zdata
$echo 1 > myid

다른 주키퍼 아이디들도 myid를 각자 붙여준다.


Zookeeper_home/config/zoo.cfg 파일

# The number of milliseconds of each tick 주키퍼가 사용하는 시간에 대한 기본측정단위
tickTime=2000
# The number of ticks that the initial 
# synchronization phase can take 초기 연결하는 시간에 대한 타임아웃 tick의 수 
initLimit=10
# The number of ticks that can pass between 
# sending a request and getting an acknowledgement 팔로워가 리더와 동기화 하는 시간에 대한 타임아웃 tick의 수 
syncLimit=5
# the directory where the snapshot is stored.
# do not use /tmp for storage, /tmp here is just 
# example sakes. 주키퍼 트랜잭션 로그와 스냅샷이 저장되는 데이터 저장경로
dataDir=/home/morriskim/kafka/data
# the port at which the clients will connect 주키퍼 TCP 사용 포트
clientPort=2181
...
server.1=localhost:2888:3888 // 주키퍼 앙상블을 위산 서버 설정, server.id 형식으로 사용

여기서 아이디를 잘 기억해야하는데 이 아이디는 서버의 id로 !!

2888포트와 3888포트는 노드끼리 연결하고, 리더 선출에 사용됨

Zookeeper 실행

$zkServer.sh start

service 등록해서 실행도 가능


Kafka 설치

$wget http://apache.mirror.cdnetworks.com/kafka/2.1.0/kafka_2.11-2.1.0.tgz

$./kafka-topics.sh --topic morris --create --zookeeper 127.0.0.1:2181 --partitions 1 --replication-factor 1

OpenJDK 64-Bit Server VM warning: If the number of processors is expected to increase from one, then you should configure the number of parallel GC threads appropriately using -XX:ParallelGCThreads=N
Created topic "morris".

Producer

[morriskim@localhost bin]$ ./kafka-console-producer.sh --broker-list localhost:9092 --topic morris
OpenJDK 64-Bit Server VM warning: If the number of processors is expected to increase from one, then you should configure the number of parallel GC threads appropriately using -XX:ParallelGCThreads=N
>hi
>are you there?
>

consumer

[morriskim@localhost bin]$ ./kafka-console-consumer.sh --bootstrap-server localhost:9092 --topic morris --from-beginning
OpenJDK 64-Bit Server VM warning: If the number of processors is expected to increase from one, then you should configure the number of parallel GC threads appropriately using -XX:ParallelGCThreads=N
hi
are you there?

메세징 시스템

메세지라고 불리는 데이터 단위를 보내는 측(publisher 또는 producer)에서 카프카에 토픽이라는 각각의 메시지 저장소에 저장하면 가져가는 측(subscribe, 컨슈머) 이 원하는 토픽에서 데이터를 가져가세 되어있음

중앙에서 메세징시스템서버를 두고 이렇게 메세지를 보내고 받는 형태의 통신을 펍섭 모델이라고 한다.

비동기 메시징 전송 방식으로 발신자의 메세지에는 수신자가 정해져 있지 않는 상태로 발행. 구독을 신청한 수신자만이 정해진 메시지를 받을수 있다.
수신자는 발신자 정보가 없어도 원하는 메시지만을 수신할 수 있다. 이러한 구조 덕분에 다이나믹한 네트워크 토폴로지와 높은 확장성을 확보 할 수 있다.

다대다 통신이 아니라 메시징 시스템을 중심으로 연결되기 때문에 확장성이 용이하다.

교환기의 룰에 의해서 데이터가 수신처의 큐에 정확하게 전달되므로 메시지 데이터 유실의 염려가 없다.

다만 펍섭의 단점은 직접 통신을 하지 않기 때문에 메시지가 정확하게 전달되었는지 확인하려면 코드가 좀더 복잡해지고, 중간에 메시징 시스템이 있기 때문에 메시지 전달 속도가 빠르지 않다는점

원래 pub/sub 모델은 대규모 데이터를 전달하는것보다 간단한 이벤트를 서로 전송하는데 주로 사용됨. 왜냐하면, 큐관리, 큐에 전달되고 가져가는 메시지의 정합성, 전달결과를 정확하게 관리하기 위한 내부 프로세스가 아주 다양하고 복잡하기 때문.

기존의 메시지 시스템은 메시지 보관, 교환, 전달과정에서 신뢰성을 보장하는 것을 중점으로 맞췄기 때문에 속도와 용량은 크게 중요하지않았음.

Kaka는 메세징 시스템이 지닌 성능의 단점을 극복 하기 위해

메시지 교환전달의 신뢰성을 프로듀서와 컨슈머쪽으로 넘기고, 부하가 많이 걸리는 교환기 기능 역시, 컨슈머가 만들수 있게 함으로써 메시징 시스템내에서 작업량을 줄이고, 이렇게 절약한 작업량을 메시징 전달 성능에 집중시켜서 고성능 메시징 시스템을 만들었음.

  • 프로듀서와 컨슈머는 각자의 역할이 정확히 구분됨
  • 기존 메시징 시스템과 동일한 비동기 시스템

메세지 전달 순서

  1. 프로듀서는 새로운 메세지를 카프카로 보냄
  2. 프로듀서가 보낸 매시지는 카프카에 컨슈머 큐에 도착해 저장됨
  3. 컨슈머는 카프카 서버에 접속하여 새로운 메시지를 가져간다.

카프카의 특징

프로듀서와 컨슈머의 분리

각 서비스 서버들은 모니터링이나 분석 시스템의 상태 유무와 관계 없이 카프카로 메시지를 보내는 역할만 하면되고, 마찬가지로, 분석 시스템들의 서비스들의 상태 유무와 관계 없이 카프카에 저장되어 있는 메시지만 가져 오면 된다.

웹서버나 다른 것이 추가 되더라도 카프카로만 보내면 되기 떄문에 서버 추가에 대한 부담도 줄일 수 있는 장점이 있다.

멀티 프로듀서, 멀티 컨슈머

카프카는 하나의 토픽에 여러 프로듀서 또는 컨슈머들이 접근 가능한 구조로 되어있다.

하나의 프로듀서가 하나의 토픽에만 메시지를 보내는 것이 아니라, 하나 또는 하나 이상의 토픽으로 메시지를 보낼 수 있다.

디스크에 메시지 저장

카프카가 기존의 메시징 시스템과 가장 다른특징 중 하나는 바로 디스크에 메시지를 저장하고 유지하는 것.

일반적인 메시징 시스템들은 컨슈머가 메시지를 읽어가면 큐에서 바로 메시지를 삭제한다.

카프카는 컨슈머가 메시지를 읽어가더라도 정해져 있는 보관 주기 동안 디스크에 메시지를 저장해둠

(컨슈머의 처리가 늦어지더라도 카프카의 디스크에 안전하게 보관되어 있기 때문에 메시지 손실 없이 가져갈 수 있다.)

확장성

카프카는 확장이 매우 용이하도록 설계

카프카 클러스터는 3대의 브로커로 시작해 수십 대의 브로커로 확장 가능하다.

높은 성능

고성능을 유지 하기 위해 카프카는 내부적으로 분산 처리, 배치 처리 등 다양한 기법을 사용

용어 정리

Kafka : 아파키 프로젝트 애플리케이션 이름, 클러스터 구성이 가능하며, 카프카 클러스터라고 부름

Broker : 카프카 애플리케이션이 설치 되어 이는 서버 또는 노드를 말한다.

Topic : 프로듀서와 컨슈머들이 카프카로 보낸 자시들의 메시지를 구분 하기 위한 네임으로 사용한다.

많은 수의 프로듀서, 컨슈머들이 동일한 카프카 를 이용하면, 메시지들이 서로 섞이는데, 토픽이라는 이름으로 구분하여 사용하게 됩니다.

Partition : 병렬처리가 가능하도록 토픽을 나눌 수 있고, 많은 양의 메시지 처리를 위해 파티션의 수를 늘려줄 수 있다.

Producer : 메시지를 생산하여 브로커의 토픽이름으로 보내는 서버 또는 애플리케이션등을 말한다.

Consumer : 브로커의 토픽이름으로 저장된 메시지를 가저가는 서버 또는 애플리케이션

+ Recent posts